1.Spring中的异常
首先,要对异常有一个清晰的认识,刚学JAVA那会儿对异常的了解很是朦胧,只知道try catch 可以捕获异常,可以输出异常。打印出异常信息,对何时应该捕获,何时抛异常并不在乎。知道上班后才渐渐的对异常处理重视起来。
一个程序不可能不出异常情况,关键在于我们能尽可能的预见将要发生的异常并提前对可能发生的异常进行处理,提高程序的健壮性。(PS:今天看了猩球崛起3,有点失望)
Spring提供了多种方式将异常转换为响应:
- 特定的Spring异常将会自动映射为指定的HTTP状态码;
- 异常上可以添加@ResponseStatus注解,从而将其映射为某一个HTTP状态码;
- 在方法上可以添加@ExceptionHandler注解,使其用来处理异常
2.将异常映射为HTTP状态码
| Spring异常 | HTTP状态码 |
|---|---|
| BindException | 400 - Bad Request |
| ConversionNotSupportedException | 500 - Internal Server Error |
| HttpMediaTypeNotAcceptableException | 406 - Not Acceptable |
| HttpMediaTypeNotSupportedException | 415 - Unsupported Media Type |
| HttpMessageNotReadableException | 400 - Bad Request |
| HttpMessageNotWritableException | 500 - Internal Server Error |
| HttpRequestMethodNotSupportedException | 405 - Method Not Allowed |
| MethodArgumentNotValidException | 400 - Bad Request |
| MissingServletRequestParameterException | 400 - Bad Request |
| MissingServletRequestPartException | 400 - Bad Request |
| NoSuchRequestHandlingMethodException | 404 - Not Found |
| TypeMismatchException | 400 - Bad Reque |
以上这些状态码是Spring默认使用的异常及对应状态码,我们也可自己映射到状态码用@ResponseStatus注解
例如:1
2
3
4
5
6
7import org.springframework.http.HttpStatus;
import org.springframework.web.bind.annotation.ResponseStatus;
(value=HttpStatus.NOT_FOUND/*404*/, reason="找不到页面")
public class SpittleNotFoundException extends RuntimeException {
}
3.编写异常处理方法
将异常映射为状态码是一个简单易用的处理方案,但是在实际开放中我们除了要返回状态码还要返回错误信息和其他一些参数,上面这种方案显然不够用。所以我们得捕获异常并返回错误信息
最常见的方式是,在每个请求的方法里捕获异常并返回相应的错误信息,JSON数据或者跳转到错误页面
也可以在每个Controller里写一个公用的方法来统一处理异常,并用@ExceptionHandler标注,这样,当有@RequestMapping的方法发生异常时,@ExceptionHandler标注的方法就会捕捉到你指定的异常并执行方法,
当然,也可以将这个异常方法写到一个BaseController里,其他Controller继承这个BaseController,甚至可以写一个全局的异常处理类,可以根据具体业务采取具体的方案
4.@ControllerAdvice为控制器添加通知
控制器通知(controller advice)是任意带有@ControllerAdvice注解的类,这个类会包含一个或多个如下类型的方法:
来一个个看:
@ExceptionHandler注解标注的方法;
有@RequestMapping的方法发生异常时会执行;
@InitBinder注解标注的方法;
前台传过来的参数都是String类型的,有些参数不能自动转换,比如Date,需要使用@initBinder注解为binder提供一个数据的转换器,这个转换器可以自己实现,也可以用spring官方的一些实现。
写个Double类型转换器1
2
3
4
5
6
7
8
9
10
11
12
13
14
15
16import org.springframework.beans.propertyeditors.PropertiesEditor;
public class DoubleEditor extends PropertiesEditor {
public void setAsText(String text) throws IllegalArgumentException {
if (text == null || text.equals("")) {
text = "0";
}
setValue(Double.parseDouble(text));
}
public String getAsText() {
return getValue().toString();
}
}
然后用@InitBinder注册
1 |
|
@ModelAttribute注解标注的方法。
被@ModelAttribute注释的方法会在此controller每个方法执行前被执行。1
2
3
4
5
6
7
8
9
10
11
12
13
14
public class HelloModelController {
public void populateModel(@RequestParam String abc, Model model) {
model.addAttribute("attributeName", abc);
}
(value = "/helloWorld")
public String helloWorld() {
return "helloWorld.jsp";
}
}
访问控制器方法helloWorld时,会首先调用populateModel方法,将页面参数abc(/helloWorld.ht?abc=text)放到model的attributeName属性中,在视图中可以直接访问。1
2
3
4
5
6
7
8
9
10
11
12
13
14
public class Hello2ModelController {
public User populateModel() {
User user=new User();
user.setAccount("ray");
return user;
}
(value = "/helloWorld2")
public String helloWorld() {
return "helloWorld.jsp";
}
}
前台可以通过user获取参数,如:${user.account}
在带有@ControllerAdvice注解的类中,以上所述的这些方法会运用到整个应用程序所有控制器中带有@RequestMapping注解的方法上。
1 |
|
5.URL重定向传参
通过URL传参
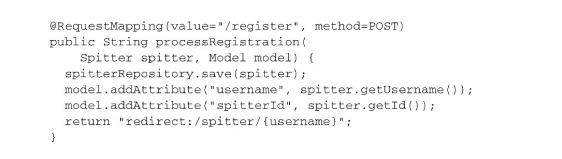
如果username属性的值是habuma并且spitterId属性的值是42,
那么结果得到的重定向URL路径将会是“/spitter/habuma?
spitterId=42”。
使用flash属性
略。。参考Spring in Action 第四版 7.5